Roofing Before-and-After Photos That Book Jobs
Roofing before-and-after photos book jobs because they turn your crew’s craftsmanship into proof a homeowner can judge in two seconds. Shoot a wide “before,” the storm damage up close, the tear-off, and a clean “after” on every roof, then put them on your website gallery, your Google Business Profile, and every estimate you send.
Right now, your best work is probably invisible. The roof you tore off and rebuilt last week looks identical to a competitor’s stock photo to a homeowner scrolling at 9 p.m. Without your own roofing before and after photos, you’re asking people to spend $12,000–$18,000 on a full tear-off based on trust alone — and most won’t. The jobs don’t disappear. They go to the roofer whose work they could actually see.
Why before-and-after roofing photos book more jobs
A homeowner comparing three bids can’t evaluate whether you used six nails per shingle, installed ice-and-water shield in the valleys, or set the drip edge correctly. They can’t see any of the things that make you good. So they judge what they can see — and that’s your photos.
The pattern shows up in the data. BrightLocal analyzed 580,853 images across 15,191 Google Business Profiles and found that listings with 100+ photos received 1,065% more website clicks and 2,717% more direction requests than the average profile. BrightLocal is clear that this is correlation, not causation — business type and overall effort play a role. But the direction is hard to argue with: profiles that show the work get found, clicked, and called more than profiles that don’t.
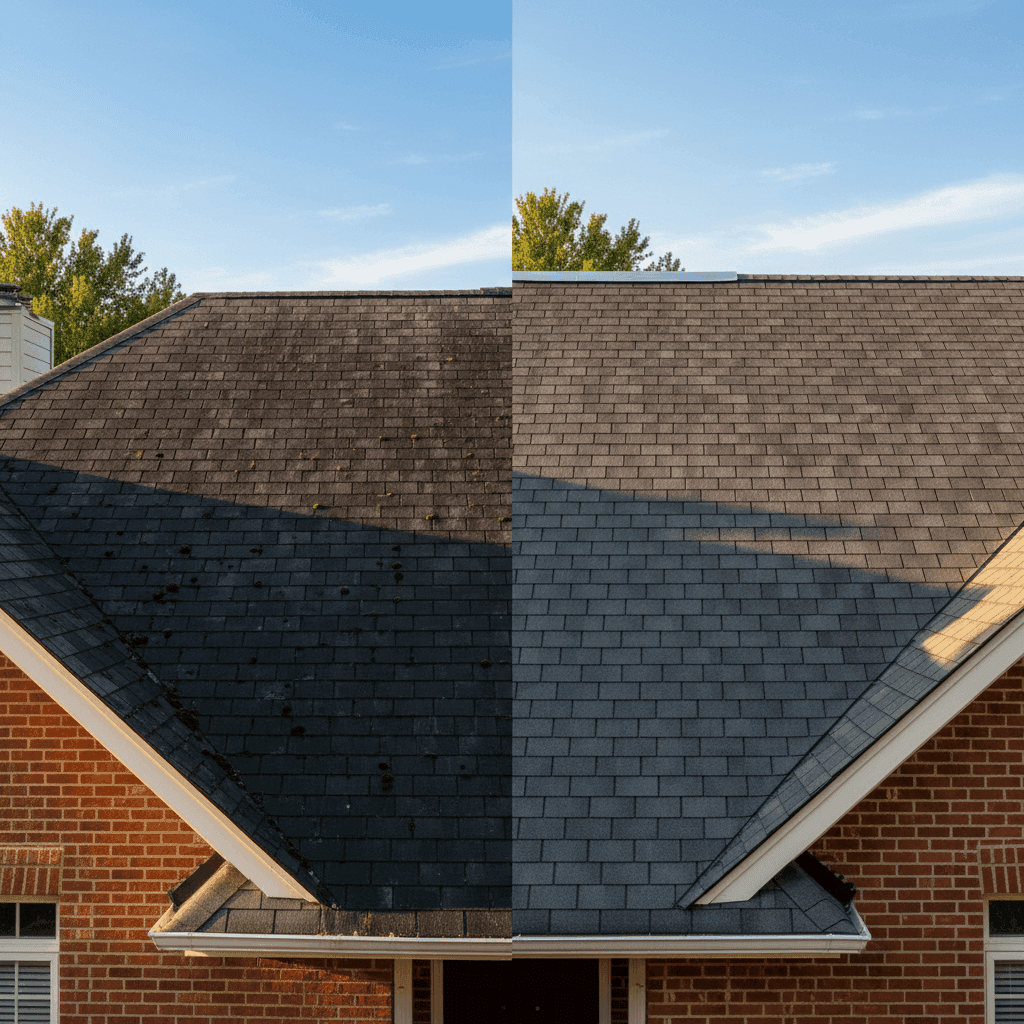
Before-and-after shots do something a single “finished roof” photo can’t. The contrast tells a story — this is what they walked into, this is what they left behind. That story is what makes a homeowner stop scrolling and pick up the phone.
The 6 photos every roofing job should capture
You don’t need a hundred shots per job. You need the right six, taken the same way every time so they tell a clean before-and-after story.
1. The wide “before.” The whole roof from the street or front yard, before you touch anything. This is half of your money shot — frame it so you can match it later.
2. The damage close-up. Lifted or missing shingles, hail bruising, granule loss, rusted flashing, a sagging ridge. This is the “why it needed replacing” proof, and it’s gold for insurance restoration jobs.
3. The tear-off. Decking exposed, old layers stacked in the driveway or dumpster. Homeowners rarely see what’s under their shingles — showing it proves you did real work, not a cosmetic overlay.
4. The deck and underlayment. Replaced decking, synthetic underlayment rolled out, ice-and-water shield at the eaves and valleys. This is the detail that separates you from the storm-chasing crew that skips steps.
5. The crew at work. Real people, branded shirts, clean job site. It signals you’re a local company that’ll still be here next season — not a truck that followed the hail in.
6. The clean “after.” Same wide angle as shot #1, plus one tight detail shot — a crisp ridge cap, new drip edge, or a clean valley. Matching the before angle is what makes the transformation land.
How to shoot roofing photos that look professional on a phone
You do not need a photographer or a drone license. A modern phone and a few habits are enough.
- Match the angle. Shoot the “after” from the exact spot you shot the “before.” Same distance, same framing. The side-by-side only works if the two line up.
- Use morning or late-afternoon light. Harsh noon sun blows out shingle detail and throws deep shadows. Softer light shows texture and color accurately.
- Clean the frame. For the “after,” move the trucks, tarps, ladders, and debris out of the shot. A clean yard reads as a clean job.
- Shoot horizontal and vertical. You’ll want wide (16:9) for your website and vertical for Google and social. Grab both.
- Wipe the lens and tap to focus. Two seconds that save a blurry, useless photo.
- Stay safe. Shoot from the ground, a ladder, or a drone only if you’re licensed to fly it. No photo is worth a fall off a steep-slope roof.
Where to put roofing photos so they actually book jobs
A great photo buried in a phone’s camera roll books nothing. Placement is what turns it into a lead. Here’s where your photos earn the most, ranked by priority.
| Placement | Effort | What it books | Priority |
|---|---|---|---|
| Website project gallery | Medium | High-intent visitors already comparing you to two other bids | Start here |
| Google Business Profile | Low | “Roofer near me” searchers deciding who to call from the map pack | Weekly |
| Google Posts | Low | A freshness signal plus storm-season searchers scanning recent work | Weekly |
| Facebook & Instagram | Medium | Neighbors, referrals, and streets you’ve canvassed | Per job |
| Estimates & proposals | Low | The homeowner deciding between you and the cheaper quote | Every bid |
Start with your website gallery, because that’s where your highest-intent traffic lands. If your current site has no gallery, loads slowly, or hides the work three clicks deep, those photos never get seen — a custom roofing website built to show your work fixes that at the source.
Then feed the same shots into your Google Business Profile every week. Photos and fresh activity are two of the levers that move you up in local search — the same levers that strong roofing SEO is built around. (More on the profile itself in our guide to Google Business Profile optimization for roofing companies.)
The 5-minute photo workflow your crew will actually use
The reason most roofers have no photos isn’t laziness — it’s that there’s no system. Give your foreman this checklist and it happens on autopilot. Screenshot it and tape it in the truck.
- Before you unload: 2 wide shots of the whole roof + 2 damage close-ups.
- Mid tear-off: 1 shot of the exposed decking and the old shingles coming off.
- During install: 1 shot of underlayment down and the crew working.
- After cleanup: the same 2 wide angles as the “before” + 1 tight detail shot.
- Before you leave: text the full set to one shared number or shared album.
- Tag it: note the address and job type (full tear-off, repair, insurance restoration) so it’s easy to find later.
Six photos, about five minutes, every job. Do it for a month and you’ll have a gallery that does more selling than any ad you can buy.
Mistakes that waste good roofing photos
Even crews that take photos often kill their value. Avoid these.
- Only shooting the “after.” No contrast, no story. The “before” is what makes the “after” impressive.
- Different angles before and after. If they don’t line up, the transformation disappears.
- Blurry, dark, or cluttered frames. A sloppy photo signals sloppy work, fair or not.
- Letting photos die in the camera roll. Unpublished photos book zero jobs.
- Using stock photos or someone else’s work. Never. It’s dishonest, homeowners can smell it, and it destroys the trust you’re trying to build.
Your photos are only half the trust equation — reviews, licenses, and guarantees carry the rest. See how they work together in our breakdown of roofing website trust signals that win more jobs, and study what converting sites do in our roundup of the best roofing websites and why they convert.
Frequently asked questions
How many before-and-after photos do I need per roofing job?
Six to eight is plenty: two wide “before” shots, two damage close-ups, one or two tear-off and underlayment shots, and two matching “after” shots. Quality and contrast matter far more than volume. A handful of sharp, well-matched before-and-after pairs sells harder than fifty random roof photos nobody organizes.
Do I need a professional photographer or a drone?
No. A modern smartphone shot in good morning or late-afternoon light is more than enough for your website, Google Business Profile, and proposals. A drone adds impressive wide angles on big or steep-slope roofs, but only fly one if you’re licensed. Consistency and matching angles beat expensive gear every time.
Where do before-and-after photos help most — my website or Google?
Both, and they feed each other. Start with your website project gallery, where your highest-intent visitors compare bids. Then post the same shots to your Google Business Profile weekly to strengthen local search and win the map pack. The same photo set works across both with zero extra shooting.
Can I use before-and-after photos on insurance restoration jobs?
Yes, and you should. Detailed damage, tear-off, and decking photos support your supplements and document the scope for the adjuster. For marketing use, just get the homeowner’s okay and avoid showing identifying details like house numbers if they’d rather stay private. The same shots serve the claim and your gallery.
How often should I post new roofing photos to Google?
Weekly is a solid target. Regular fresh photos and Google Posts signal an active, legitimate business and keep you visible to storm-season searchers scanning recent work. You don’t need every job — one clean before-and-after set a week, pulled from the jobs you’re already photographing, keeps the profile working for you.
Turn your next roof into your best salesperson
Your crew already does work worth showing. The gap is almost never the roof — it’s that the photos never make it off a phone and onto a page a homeowner actually sees. Fix the system, fix the placement, and your own work starts booking jobs for you.
Want to know whether your current site is doing that or burying your best work? Get a free quote and quick website review — we’ll tell you if your gallery, page speed, and Google presence are turning your photos into booked jobs or letting them leak.